|
I severely underestimated how long it would take me to color the rooms. Still, I had forgotten how much I using colored pencil and bringing simple lines to life with color and value. It truly is an incredible process, especially as I look back at these process photos. One thing that has made it a bit difficult is that my colored pencils are not of the same artist-grade quality as they would be if I was in the classroom, and I haven't been able to go to the school to get some. This just means it takes a bit extra time to get those smooth sharp lines and blended shading, but I am overall pleased with my progress. I am nervous about the kitchen because that room will be yellow, and I fear I won't be able to erase my pencil lines enough to prevent that awkward blending of yellow and regular pencil. I figured I'll use more of an orange color for shadows to lessen the effect of the regular pencil under the colored pencil, should this prove to be an issue.
I am definitely looking forward to getting these rooms finished so I can really bring the figure to life.
0 Comments
I made a lot of progress on laying the groundwork for my drawing this week. I was having a difficult time figuring out how I would do the interior because I wanted it to be realistic, but I didn't know how to get the perspective and shading right without just copying images from the internet. This felt like cheating, so I looked into some architecture software to try and basically try to design a house interior that I could use as a completely original reference. That proved to be hopeless. I explained my conundrum to Coach Hall, and he agreed with me that using a doll-house would be a good option. The focus of my work is on the style of the house; the physical elements are just there for realism. The real content will come when I begin using colors to bring the details to life.
Drawing the face was very challenging. It's always hard to get proportions correct on faces, especially when it's your own. I keep running into the problem of wanting to gloss over my imperfections and actually rendering myself realistically, flaws and all. I try to make sure the realistic part wins. I've obsessed over all of the details of my face, and I think I've finally reached a good point in my sketching. The upcoming week will be all about adding color. I think I am going to use colored pencil. Each room of the house will be a separate color to represent emotion: red for anger, blue for sadness, yellow for happiness, and purple for fear. I'm just going to use a black colored pencil to shade in my face and hair. I want everything to be realistic to create a sense of surrealism -- at least, as much as I can; I haven't created a truly surrealist work before, so I am going to make my best effort to do so now. These are some examples of art works that have inspired my brainstorming for this project. I am drawn to the surrealism and vivid imagery. Here is what my planning page looked like after looking through the above images. While I was sketching these designs, I was thinking about how I want to make an artwork this a continuation of some of my most recent themes: head space, the connection of body and mind, and houses. I was also especially aware of the fact that I want to draw this piece with my own hand, paying special attention to realism and detail. 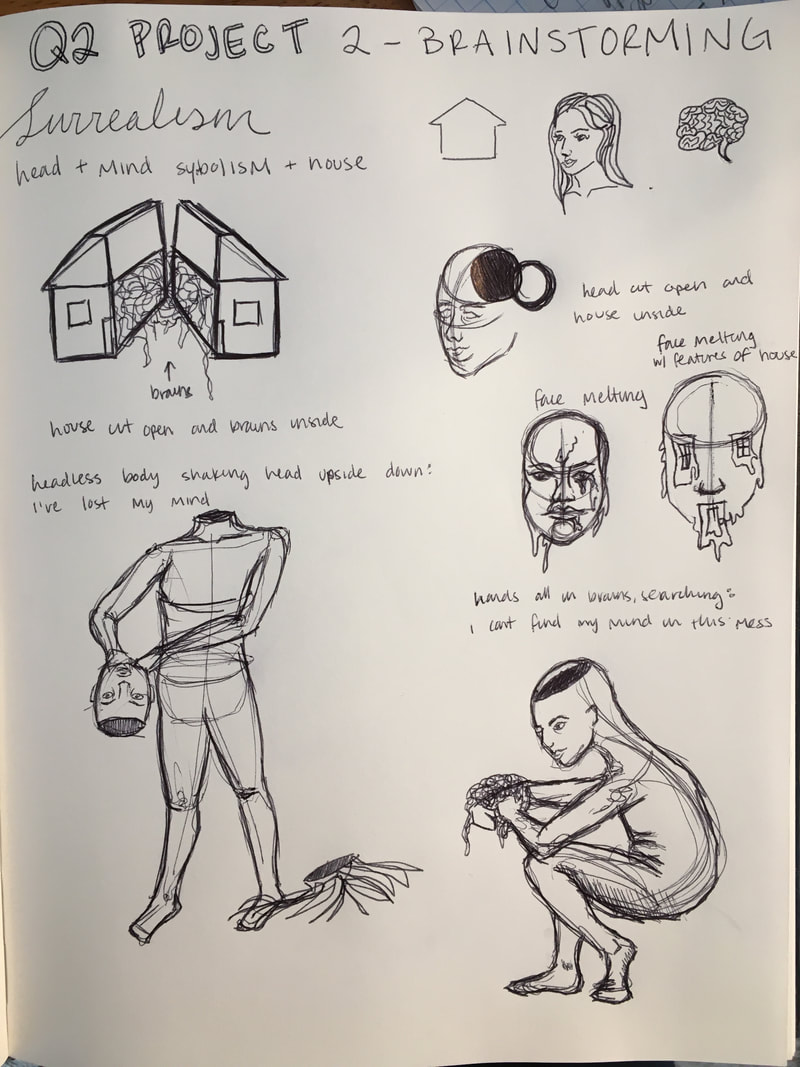 After explaining my idea to Coach Hall, this is what I came up with. My goals for this project include: working with a large scale (about 2-3 foot width and even longer length), combining my most recent themes, and focusing on formal technique to create surrealism. I am excited to begin my more detailed sketches for this project. 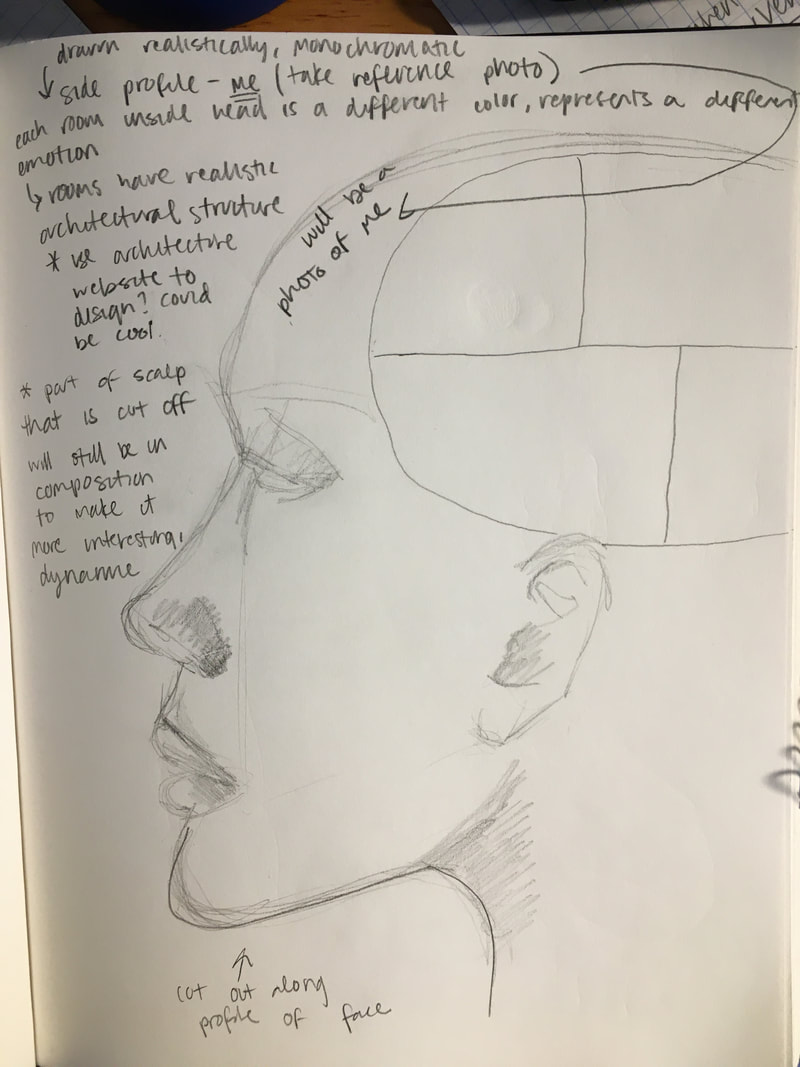 I've been working pretty hard the past week to get this project finally finished. I had to finish painting the mailbox flag and attach it; paint a few more coats onto the roof; measure, cut out, paint, and attach the windows; measure, color, cut out, and attach the flower boxes; recut and paint a window that I had attached incorrectly and reattach it. When all of these things were done, I thought I would feel like I could finally begin working on the projector element. However, the structure still felt blank, incomplete. I decided to add a simple brick texture to make it more house-like and give it a bit more realism. It took a long time to measure out the spaces for the bricks and then methodically draw them on. I messed up in one place where I got the pattern confused, but I think it would do more harm than good to try and fix it with paint or something. Needless to say, I was extremely frustrated with myself when I messed up, but I had no choice except to move forward.
After I finished the bricks, I felt like I could move on to figuring out how I was going to incorporate the video element. I had thought about making it so it would be a projected video of myself saying the words, but I knew I would feel better if I could be the one on the other side of the camera to control lighting, facial expressions, etc. I got my sister to be my model. I did her makeup in a subtle yet flattering manner. I took several different headshots from different angles and in different lighting. I decided that it would be best overlay that single picture with audio. Once I got a picture I liked, I downloaded it to my phone and edited it a bit. Then, I recorded the audio. I simply read the words aloud that I had written on my planning page in those initial steps of the process. I decided to read those words because I didn't want to lose sight of my initial vision. It was relatively easy to go in and match the audio with the photo. After that, I downloaded the file onto a hard-drive to put into the projector. It took me a few minutes to figure out how to access the file on the projector, but it was easy once I got the hang of it. The hard part was trying to position the project so that the video was projected on the piece of white paper I had glued to the front. I realized I had to cut a square out of the back so that I could stick the projector into the structure without the cord hanging out. This also made it possible for me to position it with more ease. Overall, I am content with how this project turned out. I definitely spent a lot more time on it then I had thought I would. I am glad to have finished it so I can go back to just working with some simple ink and paper. I think this project marks an interesting progression in my style and process. However, I do not intend on making three-dimensional pieces a regular occurrence; there are just so many structural and logistical concerns with materials that it just doesn't seem worth the headache. I have finally finished building! The roof was much more difficult than I had anticipated it would be. I ended up using the cool styrofoam-like material because it had these grooves in it that reminded me of a tin roof. The hot glue gun definitely saved my life when it came to securing all of the pieces. This step also took longer than I had thought because the glue sticks I have for the hot glue gun are too big, so I had to cut them into eighths to actually fit into the glue gun. I also had to recut a few pieces because I would inevitably crinkle up a piece of paper or make a miscalculation when I measured before cutting. The dimensions of the actual frame of the house are skewed, so I had to cute the flat top part at a weird angle so that it would poke out from the main frame by equal lengths on both sides. I figured this would help with minimizing the noticeably of dimensional imperfections. It took me an incredibly long time to build the mailbox flag, too. I started with the idea that I could make it using a similar technique as I remember from elementary school with folding paper boxes: we would get a template with bold lines for folding and dotted lines for cutting. After you cut along the dotted lines, you could then fold along the bold lines and tape the edges together to make a cube. I figured I could do something similar for the mailbox flag so that i didn't have to cut any cardboard. The reason I was putting so much effort into making it three-dimensional is because I plan on keeping the actual details of the house (like windows) very minimal, so I want the structural features to look well done. Ultimately, this idea failed. I had to resort to cutting the shape from a piece of cardboard and then cutting strips of paper to cover all of the surfaces so I would have a smooth surface to paint on.
I will be getting the projector from Coach soon to work on the face part. I am not sure how that aspect will turn out, but I am trying to keep my mind open. I do think, though, that projecting a video of a (maybe my?) face will provide me with a nice opportunity to include audio that can help make my content more clear. Since my last post, I added a lot color to the piece. It felt very empty with all of the white space, not at all like the reference photo. I had wanted to use only the pen nibs for the colors, but I soon realized it would be much better to use some paint brushes. The brushes really helped with covering more space at one time and gave me better control over line quality. My process mostly involved switching back and forth between colors to build up layers. The silver ink was definitely helpful in a few areas that I felt were too dark. Using a paintbrush to go over the shadows around the eye made it a lot easier, and also a better texture than just using the pen nib,. Though, I do like the almost scratchy look of the copper part of the eye for which I used the pen nib; I feel like it reads like it has actual form.
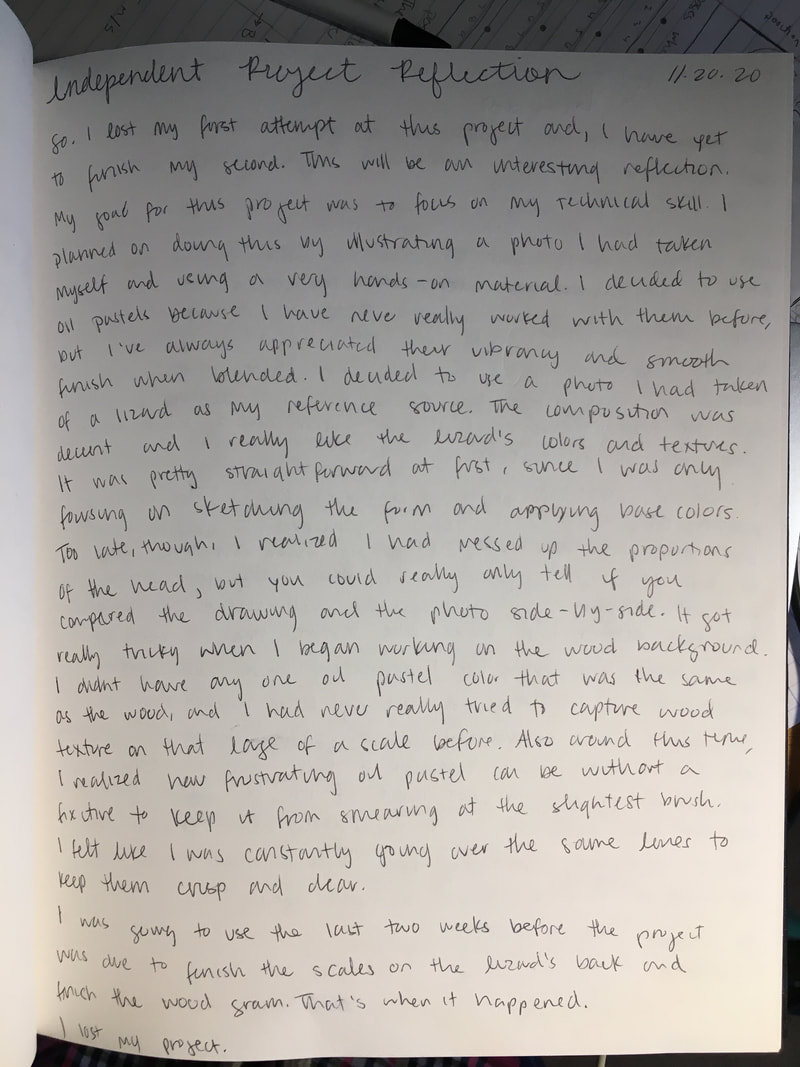
Overall, I am very pleased with how this piece turned out. It's wild because this is not at ALL like the lizard oil pastel drawing I had started a few weeks ago, but I am happy nevertheless. I enjoyed the entire process of sketching the form and then bringing it to life with color. It also helped that the colors were glittery, too. My in-class projects have been going down a very different path than this piece; I have been drawn to more conceptual pieces, placing less emphasis on technical skill than content. However, creating this work has really reminded me of my immense respect for technique and formal skill. I would like to work in a similar medium and style for my next in-class project. I will likely try to combine my appreciate for meaningful content and this type of medium to create a piece that is equal parts formal skill and significant. After my progress this past week, I really only have to add the roof before I can start on details. I prolly could have built the structure faster using tape or something, but I have learned that quicker does not always equal better. In fact, it usually doesn't mean better. I worked on pasting the paper to the cardboard. I also secured the top part that the roof will attach to. As soon as I get the roof attached, I will begin adding the windows and mailbox flag. I will also work on the door design for the opening of the mailbox. There are a few places where the paper doesn't fully cover the cardboard or the glue is peeking through, especially at the vertices. I have yet to decide how I am going to address these imperfections, but I know that I absolutely will address them. I want to make sure that even though the quality of my materials isn't exception, the quality of my craftsmanship is as good as I can make it. I think I will probably paint the inside black, but I may not paint it at all. I definitely need to cover the back wall with a piece of paper because you can see the design from the cardboard box on it. I hope to finish the roof in the next few days and then spend Thanksgiving break and the following week of class to add the details and really bring it all together.
This is my initial design. My goal for this project is to make a sculpture of the same sort of mailbox shape as my last artwork. Coach wants me to focus on making my content more accessible, since I think it really wasn't clear what I was trying to convey by just looking at my last piece. Considering these two distinct goals made it difficult for me to know where to begin, and especially when it came to exactly what I was going to use to build the mailbox. Coach suggested actually buying one and just modifying it, but something about that bothered me; it felt like cheating. We have a lot of cardboard boxes around the house, so I decided to construct my structure from one of those. I decided I would use this thick drawing paper to paste onto the sides of the cardboard and do the details on that surface, as that would give me a bit more control over the quality of my work. But, I was so eager to just start, I rushed through the boring parts -- measuring and cutting. My structure was lopsided and unstable. It did not lool like the start of a project I would be proud of. So, I decided to simply use this as a prototype, and start again. I found some extremely rigid and durable cardboard. I carefully took the measurements from my prototype and made clear lines on the cardboard to follow as I cut. I used a box-cutter for more precision and a cleaner cut than scissors. I made sure that the measurements for both the cardboard pieces and paper pieces matched up well. After I cut the cardboard shapes for the front, back, top, bottom, and roof, I will secure them using hot glue. I have paste to attach the paper pieces, though I likely won't attach them until after they're decorated like the sides of house. This piece is a sort of synthesis of my mailbox piece and my house piece from Art IV. I know I will want to include words in the piece, though I am not yet sure exactly how much writing I want or where I want it to go. I will figure those things out after I actually make the piece. 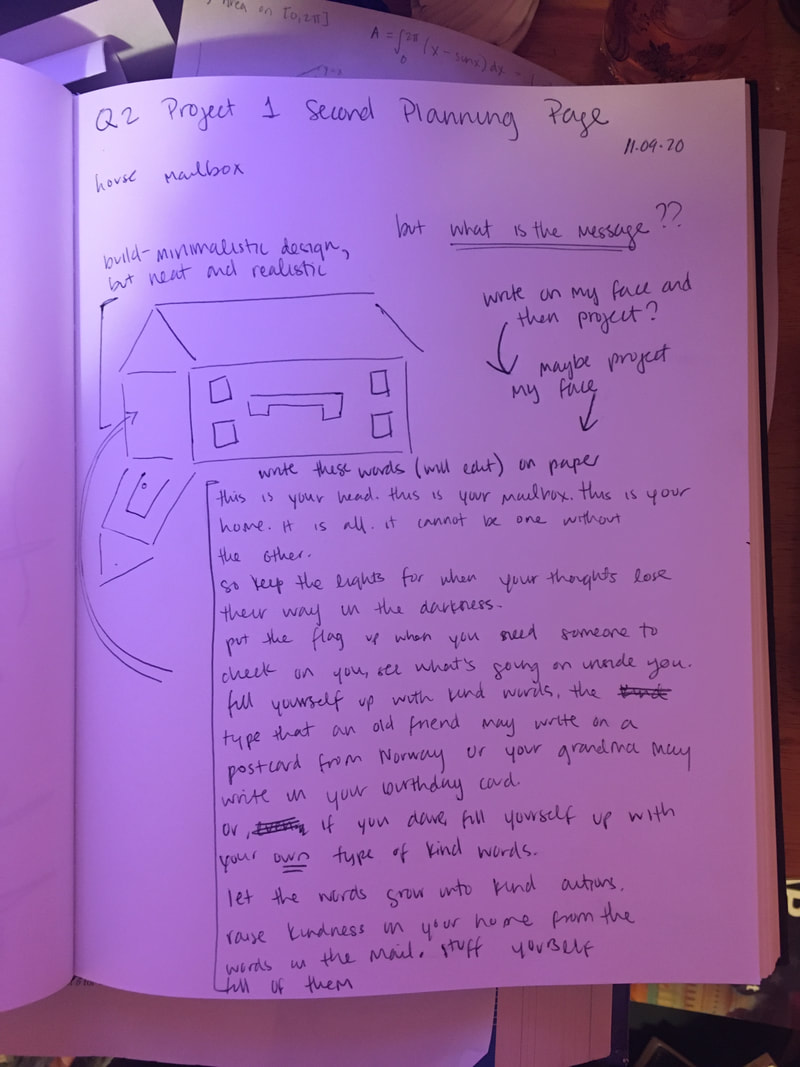 So, this is it! Not at all what I thought the final product would look like, but I am happy nevertheless. I spent a long time going over fine details this week, especially with shading around the face and on the lips. Coach and I also talked about adding a vertical color block to represent the mail box post, but I decided to create the whole form so that there was truly enough context for the viewer to understand that this is, indeed, a mailbox. I changed the coloring of the letter page because the yellow just seemed too jarring, for some reason. I added the curl and shadows to give it some depth and real form, rather than just appearing flat. I struggle a lot with deciding if I needed to add more shadows and highlights to the paper, as if it were crinkled, but I abandoned this idea after spending a good hour or two erasing and re-drawing lines. I was going to write more on the page, but I didn't like idea of the message being partially hidden, and I didn't want the viewer trying to fill in the blanks. This is why I feel like the title of my piece is very important; it provides the viewer with an explanatory statement. Personally, I believe that titles can be expressive in their own right, but are not helpful when they are excessively aloof or removed from the piece itself. All in all, I am happy with where this project ended. I would like to move forward with creating a sculptural piece that explores a similar theme, which Coach and I have already briefly discussed. |
Archives
March 2021
Categories |
 RSS Feed
